
Working on your BMW’s engine can feel like a big win, especially when you handle a job that seems tricky at first. One task that fits this bill is removing the junction box from the intake manifold. This small but vital part ties into your car’s electrical system, and taking it out might be necessary for repairs or upgrades. Don’t worry—our guide breaks it down into simple steps you can follow.
In this post, we’ll walk you through the process with clear instructions and handy tips. You’ll find two methods: one that pops the junction box off its bracket and another that pulls the whole bracket free. By the end, you’ll know exactly how to get this done with confidence.
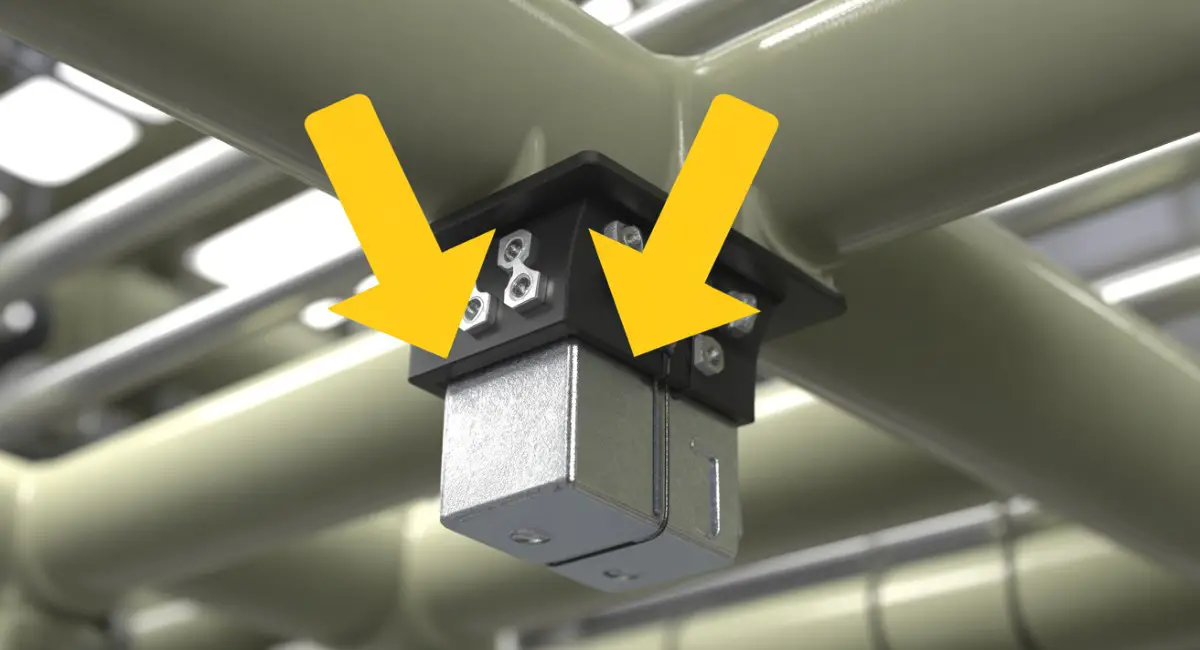
What Does the Junction Box Do?
The junction box, sometimes called the wiring harness junction box, sits under the intake manifold in your BMW’s engine bay. It acts like a central hub, linking sensors, actuators, and other electrical bits to the main wiring system. Tucked away near the throttle body, it stays safe from heat and grime—but that spot also makes it a little tough to reach.
So, why would you need to remove it? Here are some common reasons:
- To fix or replace a damaged junction box
- To reach parts like the starter motor or oil separator hidden beneath the manifold
- To clean the engine bay thoroughly
- To tweak or upgrade your car’s electrical setup
Knowing what the junction box does and where it hides sets you up for success. Next, let’s gather the tools you’ll need.
Tools to Grab Before You Start
Prep is key, so round up these tools before diving in:
- Small flathead screwdriver
- Torx screwdriver or socket set (T27 and T30 sizes work best)
- Extensions for those hard-to-reach screws
- Lubricant like PB Blaster (optional, for stubborn tabs)
- Camera or smartphone to snap reference pics
With these in hand, you’re ready to roll. Let’s jump into the steps.
Step-by-Step: Removing the Junction Box
You’ve got two solid ways to tackle this job. One keeps things quick by sliding the junction box off its bracket. The other takes a bit more effort, removing the bracket entirely. We’ll cover both so you can pick what suits you.
Method 1: Slide the Junction Box Off the Bracket
This approach saves time and skips messing with the manifold too much. Here’s how it goes:
- Cut the power: Disconnect the negative battery terminal first. This keeps you safe from shorts or shocks.
- Spot the junction box: Look under the intake manifold, near the throttle body. You might need to shift the air intake aside for a clear view, but that’s not always a must.
- Unplug the connectors: Gently pull all electrical connectors off the junction box. Snap a few photos before you do—this helps you plug them back later.
- Find the tabs: Check the metal bracket holding the junction box. You’ll see two tabs, usually on the sides or top, locking it in place.
- Pop the tabs loose: Grab your flathead screwdriver and slip it between a tab and the box. Pry the tab out gently while pushing the box away from the throttle body. Work both tabs bit by bit to keep things even.
- Pull it free: Once the tabs let go, the junction box slides right off. Set it down carefully so no wires get yanked.
Method 2: Take the Whole Bracket Off
If the tabs won’t budge or you want the full assembly out, try this method:
- Kill the power: Start by unhooking the negative battery terminal. Safety first.
- Locate the screws: The bracket sticks to the manifold with two Torx screws. The front one’s easy to reach from above; the back one might need you to go under the car.
- Remove the front screw: Use your Torx screwdriver (T27 or T30—check your model) to take out the front screw. It should spin out without much fight.
- Reach the back screw: Jack up the car and secure it with stands. Use an extension on your Torx tool to hit the back screw from below. Taking off the passenger-side wheel can open up more space.
- Undo the back screw: Turn it out slow—this one’s trickier. Patience pays off here.
- Lift the bracket: With both screws gone, pull the bracket and junction box off the manifold together.
- Unhook the connectors: If they’re still attached, unplug all the electrical connectors now.

Handy Tips to Keep in Mind
- Stuck tabs? If they won’t move, dab some PB Blaster on them. Let it sit a few minutes, then try again.
- Rusty screws? Spray penetrating oil on them and wait. If they strip, a screw extractor can save the day.
- Wires in the way? Handle them gently. Don’t tug or twist too hard, or you’ll be fixing more than you planned.
- Putting it back? Make sure all connectors click in tight. Tighten screws snug, but don’t overdo it.
Fixing Hiccups Along the Way
Run into trouble? Here’s how to sort it out:
- Tabs stay put: Wiggle the box a little while prying with the screwdriver. Still stuck? Hit them with penetrating oil and wait 10-15 minutes.
- Screws strip out: Grab a screw extractor kit. Worst case, drill them out and retap the holes.
- Wires snap: If one breaks, check a wiring diagram for your BMW model. Solder it up and seal it with heat shrink tubing.

Quick Note on the Intake Manifold
The intake manifold spreads the air-fuel mix to your engine’s cylinders, keeping things running smooth. You don’t always need to touch it for this job, but some BMW models might call for it to reach other parts. Stick to our steps here, and you can usually skip that hassle.
Wrapping It Up
Taking the BMW junction box off the intake manifold isn’t as tough as it looks. Follow these steps, grab the right tools, and take it slow. Snap pics as you go, and treat the wires with care. You’ll have it out in no time, ready to fix, clean, or upgrade whatever’s next.
Got this down? You’re set to handle more DIY jobs like a champ. Happy tinkering!