
Brake dust is the pesky, dark grime that coats your wheels, turning a shiny set into an eyesore. It’s not just about looks—leaving it on too long can harm your wheels, leading to corrosion and pricey fixes. Lucky for you, removing brake dust isn’t rocket science. With the right approach, you can restore that showroom gleam and keep it there. This guide dives deep into everything you need to know: what brake dust is, why it’s a problem, and how to tackle it step-by-step. Expect practical tips, tools you’ll need, and even ways to stop it from coming back. Let’s roll up our sleeves and get those wheels sparkling!
What Is Brake Dust?
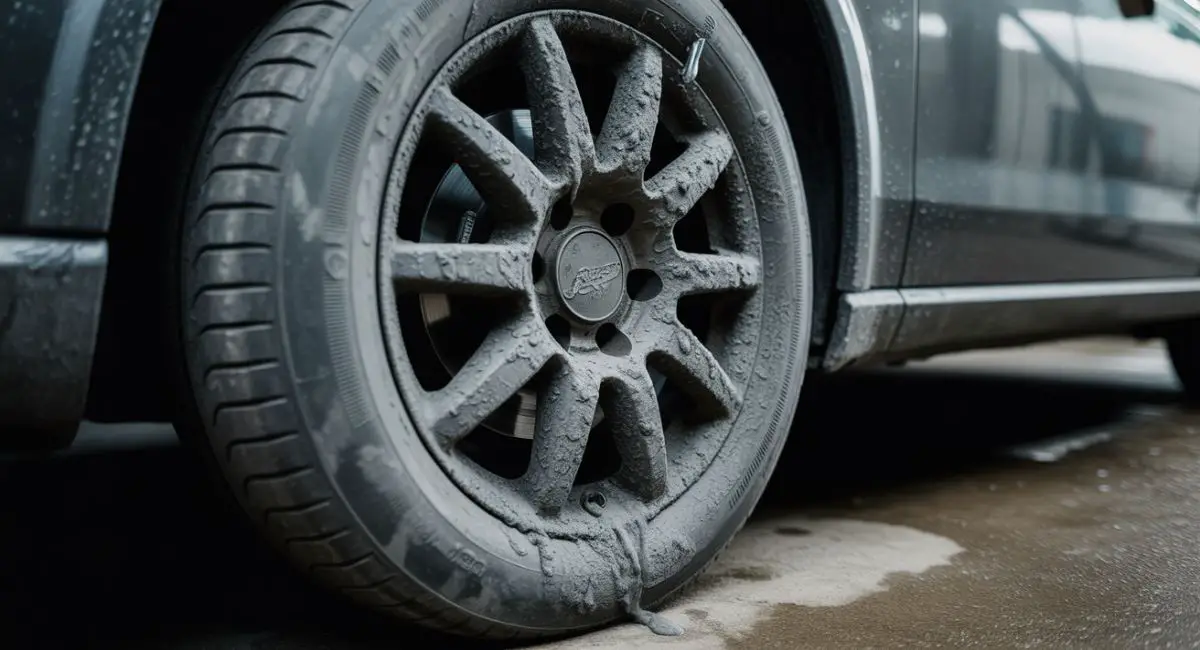
Brake dust comes from your car’s braking system. Every time you hit the brakes, the pads rub against the rotors, shedding tiny bits of metal, carbon, and adhesive. These particles don’t just vanish—they stick to your wheels, forming a stubborn, black layer. It’s gritty, it’s ugly, and it’s tougher to clean than regular dirt.
Why does this matter? For starters, brake dust makes your wheels look dirty no matter how clean the rest of your car is. Beyond that, it’s corrosive. The metal bits can eat into your wheel’s finish, causing pitting or rust over time. Ignoring it might mean shelling out big bucks for repairs or new wheels. Cleaning it off regularly keeps your ride looking sharp and protects your investment.
Why You Should Remove Brake Dust
Let’s break it down. Clean wheels boost your car’s curb appeal—think of them as the shoes of your vehicle. A polished set stands out, while dusty ones drag the whole look down. But it’s not all vanity. Here’s why it’s worth your time:
- Prevents Damage: Brake dust’s corrosive nature can chew through protective coatings, leaving wheels vulnerable to rust and scratches.
- Saves Money: Catching it early avoids costly repairs or replacements. A little effort now beats a big bill later.
- Boosts Resale Value: A well-maintained car, right down to the wheels, fetches a better price when you sell.
Convinced yet? Good. Now, let’s gear up to tackle it.
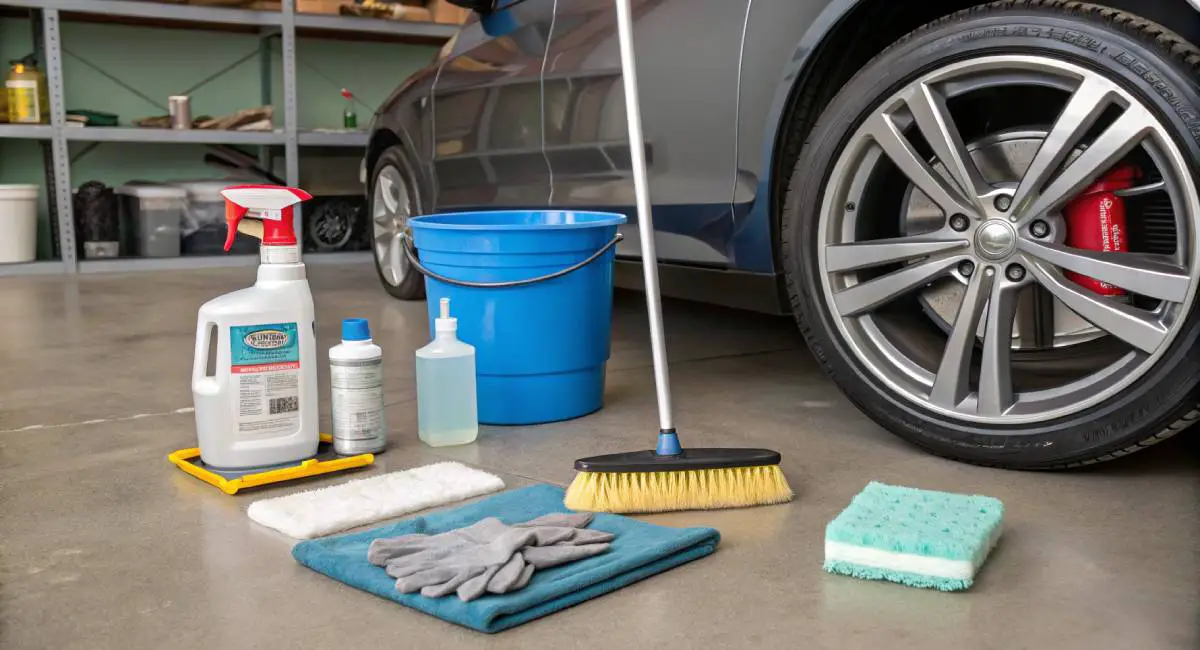
Tools and Supplies You’ll Need
Before you dive in, gather your arsenal. Having the right stuff makes the job quicker and keeps your wheels safe. Here’s your checklist:
- Wheel Cleaner: Pick a pH-balanced, non-acidic formula safe for your wheel type—coated, chrome, or painted.
- Soft-Bristle Wheel Brush: Stiff bristles scratch; soft ones clean without harm.
- Microfiber Cloths: Perfect for drying and polishing without streaks or lint.
- Bucket of Water: Keeps your brush and cloths rinsed and ready.
- Hose or Pressure Washer: Blasts off loose grime before and after scrubbing.
- Gloves and Safety Glasses: Brake dust can irritate skin and eyes—stay protected.
- Wheel Wax or Sealant (Optional): Adds a protective layer and extra shine.
Quick Note: Check your wheel’s finish. Chrome needs a gentler touch than painted alloys. Unsure? Peek at your owner’s manual or the wheel itself for clues.
How to Remove Brake Dust: Step-by-Step
Ready to get those wheels spotless? Follow these steps for a thorough clean that works every time.
Step 1: Prep Your Wheels
Start smart. Hot wheels and cleaning don’t mix—heat can mess with your cleaner or damage the finish. Let them cool after driving. Next, grab your hose or pressure washer and rinse off loose dirt and dust. This cuts down on scratching when you scrub.
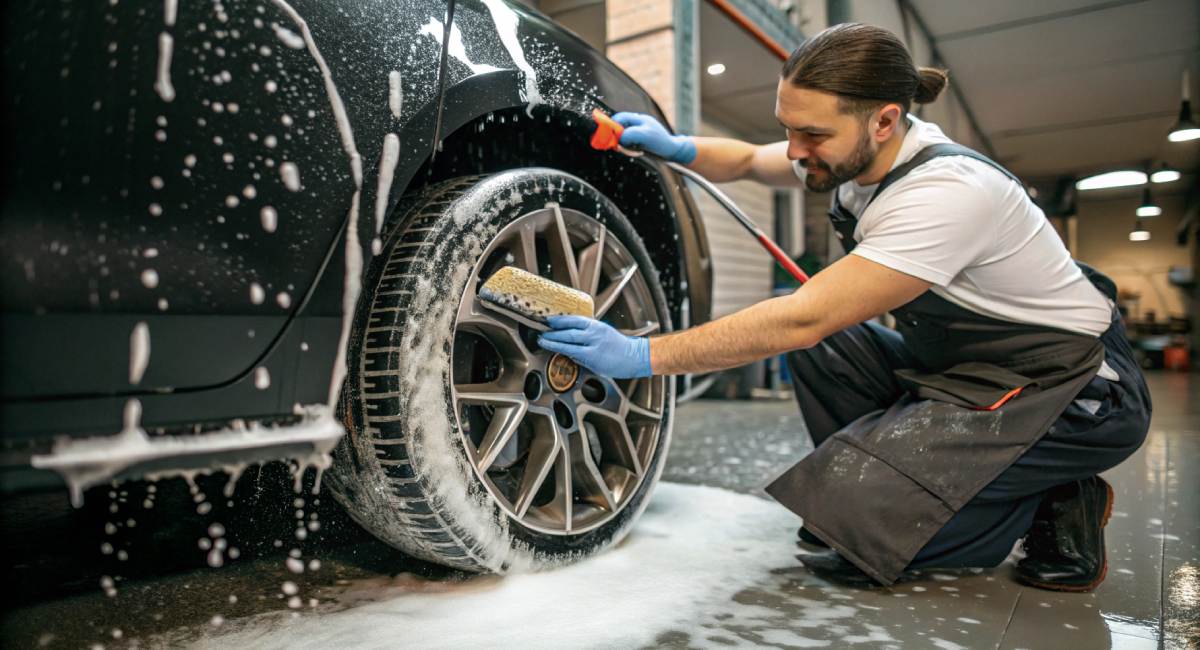
Step 2: Spray on Wheel Cleaner
Grab your cleaner and spray it evenly across the wheel, holding the bottle about 6 inches away. Coat every spot, especially around lug nuts and spokes. Let it sit for 1-2 minutes—check the label for exact timing. Some cleaners change color (purple or red) as they break down the dust. That’s your cue it’s working.
Step 3: Scrub Gently
Dip your soft-bristle brush in water and start scrubbing. Work top to bottom, hitting all the nooks where dust hides. Don’t go overboard with pressure—the cleaner softens the grime, so let it do the heavy lifting. Rinse the brush often to avoid spreading dirt around.
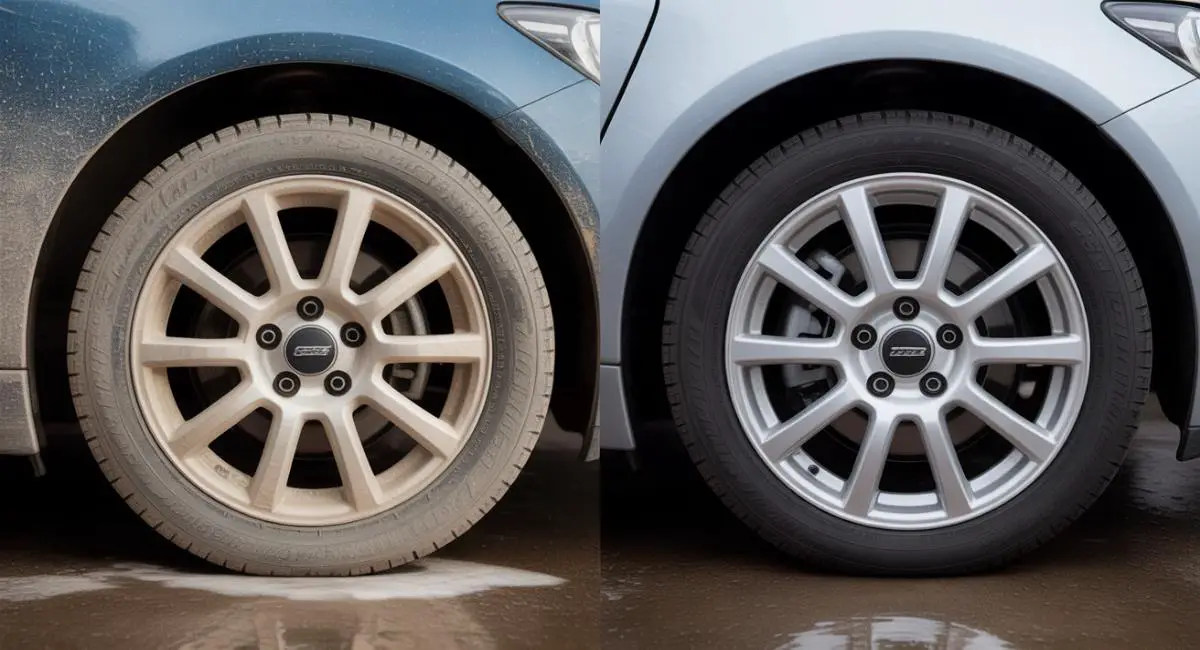
Step 4: Rinse It Off
Back to the hose or pressure washer. Blast away the cleaner and loosened dust until the water runs clear. Leftover cleaner can dry into streaks or harm the finish, so be thorough.
Step 5: Dry and Shine
Wipe the wheel dry with a microfiber cloth to dodge water spots. Want that extra pop? Rub on some wheel wax or sealant with another clean cloth. It’s optional but worth it for shine and protection.
Hack: For caked-on dust, try a clay bar after rinsing. It pulls out embedded particles without scratching.
Tailoring the Process to Your Wheels
Different wheels need different care. Here’s how to adjust:
- Clear-Coated Wheels: Stick to pH-neutral cleaners and swap the brush for a soft sponge if you’re worried about scratches.
- Chrome Wheels: Use a chrome-safe cleaner and finish with a chrome polish for that mirror effect.
- Painted Wheels: Mild cleaners only—harsh stuff can strip paint. Buff gently with microfiber.
Not sure what you’ve got? Look for labels on the wheel or dig into your car’s manual.
How to Prevent Brake Dust Buildup
Clean wheels are great, but keeping them that way is better. Try these tricks to cut down on dust:
- Switch Brake Pads: Low-dust or ceramic pads shed less grime. They cost more upfront but save cleaning time.
- Seal the Deal: A wheel sealant creates a slick surface dust struggles to grip. Reapply every few months.
- Stay on It: Clean every two weeks or after long trips. Fresh dust wipes off easier than baked-on layers.
- Cover Up: If your car sits idle, wheel covers block dust and dirt.
Fun Fact: High-performance pads often make more dust for better braking. If you’ve got those, plan to clean more often.
Mistakes That Can Ruin Your Wheels
Even pros mess up sometimes. Avoid these slip-ups:
- Wrong Cleaner: Acidic formulas wreck finishes. Match the cleaner to your wheel type.
- Over-Scrubbing: Hard brushing leaves marks. Go easy and let the cleaner work.
- Lazy Rinsing: Leftover residue streaks or corrodes. Rinse until it’s gone.
- Hot Cleaning: Cleaners on hot wheels dry fast or react badly. Cool first.
Digging Deeper: What Makes Brake Dust So Stubborn?
Brake dust isn’t your average dirt. Its metal content—iron from rotors, steel from pads—bonds to wheels like glue. Heat from braking bakes it on, embedding particles into the surface. That’s why water alone won’t cut it. You need a cleaner that breaks those bonds and a brush to lift them away.
Ever notice more dust on front wheels? They do most of the braking, so they catch more grime. Rear wheels still need love, just not as often.
Benefits of Keeping Wheels Clean
Why bother? Here’s the payoff:
- Longevity: Less corrosion means wheels last longer.
- Looks: Shiny wheels make your car pop, plain and simple.
- Safety Check: Cleaning lets you spot cracks, curb rash, or brake issues early.
Plus, there’s that feel-good vibe. A clean car feels like a win, and gleaming wheels seal the deal.
When DIY Isn’t Enough
Most brake dust jobs are DIY territory, but sometimes you need backup:
- Bad Corrosion: Pitted or rusted wheels might need a pro’s touch—or replacement.
- Fancy Finishes: Custom coatings can be tricky. Experts know the right moves.
- No Time: Detailers charge $50-$150 to handle it, depending on where you are.
If it’s just regular dust, though, you’ve got this.
Extra Tips for Wheel Cleaning Pros
Want to level up? Here’s some insider advice:
- Test First: New cleaner? Spray a small spot and wait a minute to check for damage.
- Double Up: For tough dust, hit it with cleaner twice—rinse between rounds.
- Tire Bonus: While you’re at it, scrub your tires with a separate brush and cleaner for a full refresh.
Your Wheel Cleaning Routine
Make it a habit. Set a schedule—every two weeks or after muddy drives. Keep your tools handy in a bucket or bag. A quick rinse between deep cleans holds dust at bay. Consistency turns a chore into a breeze.
Final Thoughts
Removing brake dust from wheels is a simple fix with big rewards. Grab a good cleaner, a soft brush, and a hose, then follow the steps: prep, spray, scrub, rinse, dry. Adjust for your wheel type, avoid rookie mistakes, and seal the deal with wax or new pads to keep dust away. Your wheels will shine, your car will look killer, and you’ll dodge pricey repairs. So, what are you waiting for? Get out there and make those wheels sparkle—you’ve got everything you need right here!